Z06-02 专题-vitepress
[TOC]
TIP
官方文档:https://vitepress.dev/zh/guide/what-is-vitepress
视频教程:https://space.bilibili.com/162101364/channel/collectiondetail?sid=1844787&ctype=0
环境搭建
安装
TIP
环境:Node.js 18 及以上版本
版本:vitepress@1.3.1
1、安装 vitepress
$ pnpm add -D vitepress2、安装向导
$ pnpm vitepress init将需要回答几个简单的问题:
┌  Welcome to VitePress!
│
◇  Where should VitePress initialize the config?
│  ./
│
◇  Site title:
│  mr笔记
│
◇  Site description:
│
│
◆  Theme:
│  ○ Default Theme (Out of the box, good-looking docs)
│  ● Default Theme + Customization
│  ○ Custom Theme
└文件结构
因为选择在./目录下建设站点,目录结构如下
.
│  api-examples.md
│  index.md
│  markdown-examples.md
│  vitepress.md

│  package.json
│  pnpm-lock.yaml
│
└─.vitepress # 当前目录所在的位置就是文档的根目录
    │  config.mjs # 项目的配置文件,最重要
    │
    └─theme # 主题目录
            index.js
style.css配置文件
配置文件 (.vitepress/config.js) 让你能够自定义 VitePress 站点的各个方面,最基本的选项是站点的标题和描述:
// .vitepress/config.js
export default {
  // 站点级选项
  title: 'VitePress',
  description: 'Just playing around.',

  themeConfig: {
    // 主题级选项
  }
}Markdown 扩展
frontmatter
title:
string,页面的标题。它与 config.title 相同,并且覆盖站点级配置。titleTemplate:
string | boolean,标题的后缀。它与 config.titleTemplate 相同,它会覆盖站点级别的配置。description:
string,页面的描述。它与 config.description 相同,它会覆盖站点级别的配置。head:
HeadConfig[],指定要为当前页面注入的额外 head 标签。将附加在站点级配置注入的头部标签之后。layout:
doc | home | page,默认:doc,指定页面的布局。doc:它将默认文档样式应用于 markdown 内容。home:“主页”的特殊布局。可以添加额外的选项,例如hero和features,以快速创建漂亮的落地页。page:表现类似于doc,但它不对内容应用任何样式。当想创建一个完全自定义的页面时很有用。
hero:
home page only,当layout设置为home时,定义主页 hero 部分的内容。features:
home page only,定义当layout设置为home时要在 features 部分中显示的项目。navbar:
boolean,默认:true,是否显示导航栏。sidebar:
boolean,默认:true,是否显示侧边栏。aside:
boolean | 'left',默认:true,定义侧边栏组件在doc布局中的位置。- 将此值设置为
false可禁用侧边栏容器。 - 将此值设置为
true会将侧边栏渲染到右侧。 - 将此值设置为
left会将侧边栏渲染到左侧。
- 将此值设置为
outline:
number | [number, number] | 'deep' | false,默认:2,大纲中显示的标题级别。它与 config.themeConfig.outline.level 相同,它会覆盖站点级的配置。lastUpdated:
boolean | Date,默认:true,是否在当前页面的页脚中显示最后更新时间的文本。如果指定了日期时间,则会显示该日期时间而不是上次 git 修改的时间戳。editLink:
boolean,默认:true,是否在当前页的页脚显示编辑链接。footer:
boolean,默认:true,是否显示页脚。pageClass:
string,将额外的类名称添加到特定页面。然后可以在.vitepress/theme/custom.css文件中自定义该特定页面的样式。css.custom-page-class { /* 特定页面的样式 */ }
注意: 以上的配置可以通过$frontmatter访问
---
title: Hello
---

# {{ $frontmatter.title }}示例:
---
title: 文章标题

titleTemplate: Vite & Vue powered static site generator

description: VitePress

head:
  - - meta
    - name: description
      content: hello
  - - meta
    - name: keywords
      content: super duper SEO

layout: doc

hero:
  name: VitePress
  text: Vite & Vue powered static site generator.
  tagline: Lorem ipsum...
  image:
    src: /logo.png
    alt: VitePress
  actions:
    - theme: brand
      text: Get Started
      link: /guide/what-is-vitepress
    - theme: alt
      text: View on GitHub
      link: https://github.com/vuejs/vitepress

features:
  - icon: 🛠️
    title: Simple and minimal, always
    details: Lorem ipsum...
  - icon:
      src: /cool-feature-icon.svg
    title: Another cool feature
    details: Lorem ipsum...
  - icon:
      dark: /dark-feature-icon.svg
      light: /light-feature-icon.svg
    title: Another cool feature
    details: Lorem ipsum...

navbar: true

sidebar: true

aside: true

lastUpdated: true

editLink: true

footer: true

pageClass: custom-page-class
---TOC
输入:
[[toc]]输出:
目录列表
配置:
可以使用 markdown.toc 选项配置 TOC 的呈现效果。
  markdown: {
    toc: {
      level: [2, 3, 4, 5, 6, 7, 8]
    }
},自定义容器
info
::: info 自定义标题
This is an info box.
:::

> [!NOTE] 自定义标题
> 强调用户在快速浏览文档时也不应忽略的重要信息。
tip
::: tip 自定义标题
This is a tip.
:::

> [!TIP] 自定义标题
> 有助于用户更顺利达成目标的建议性信息。
important
> [!IMPORTANT] 自定义标题
> 对用户达成目标至关重要的信息。
warning
::: warning 自定义标题
This is a warning.
:::

> [!WARNING] 自定义标题
> 因为可能存在风险,所以需要用户立即关注的关键内容。
danger
::: danger 自定义标题
This is a dangerous warning.
:::

> [!CAUTION] 自定义标题
> 行为可能带来的负面影响。
details
::: details 自定义标题
This is a details block.
:::
全局设置自定义标题
可以通过在站点配置中添加以下内容 markdown.container.tipLabel 来全局设置自定义标题,如果不是用英语书写,这会很有帮助:
// config.ts
export default defineConfig({
  // ...
  markdown: {
    container: {
      tipLabel: '提示',
      warningLabel: '警告',
      dangerLabel: '危险',
      infoLabel: '信息',
      detailsLabel: '详细信息'
    }
  }
  // ...
})语法高亮
常用的高亮语言:
- c
- cpp,c++
- css
- html
- http
- java
- javascript,js
- typescript,ts
- json
- jsx
- tsx
- less
- sass
- scss
- markdown,md
- php
- postcss
- python,py
- regexp,regex
- ruby,rb
- shellscript,bash,sh,shell
- sql
- stylus,styl
- vue
- wasm
- xml
- yaml,yml
行高亮
行高亮
# 单行
```js {4}
```

# 多个单行
```js {4,7,9}
```

# 多行
```js {4-8}
```

# 多行与单行
```js {4,7-13,16,23-27,40}
```!code
[!code highlight]: 行高亮
# 行高亮
```js
export default {
  data () {
    return {
      msg: 'Highlighted!'
    }
  }
}
```[!code focus]: 聚焦
[!code focus][!code focus:<lines>]
# 聚焦
```js
export default {
  data () {
    return {
      msg: 'Focused!'
    }
  }
}
```[!code --]: 颜色差异
[!code --][!code ++]
# 颜色差异
```js
export default {
  data () {
    return {
      msg: 'Removed'
      msg: 'Added'
    }
  }
}
```[!code warning]: 警告
[!code error]: 错误
# 错误,警告
```js
export default {
  data () {
    return {
      msg: 'Error',
      msg: 'Warning'
    }
  }
}
```单词高亮 *@
配置:.vitepress\config.mjs
import { transformerNotationWordHighlight, transformerMetaWordHighlight } from '@shikijs/transformers'

export default defineConfig({
  markdown: {
    codeTransformers: [
        transformerNotationWordHighlight(),  // [!code word:Hello]
        transformerMetaWordHighlight() // ```js /Hello/
    ]
  },
})方式一:注释高亮(transformerNotationWordHighlight)
语法:
在后续代码中使用 [!code word:Hello] 高亮Hello。
// 1. 基本语法:默认影响多行
[!code word:xxx]

// 2. 指定影响行数
[!code word:xxx:1]特性:
默认影响多行:在后续多行都会生效(第2/3行中的 Hello 都会高亮)
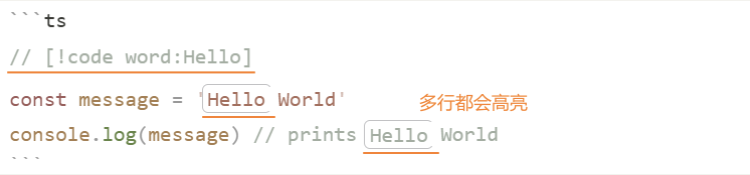
编写位置在当前行末尾:默认影响多行(包括当前行)

指定影响行数:
可以指定要高亮单词的行数,例如
[!code word:Hello:1]只会在下一行高亮出现的Hello。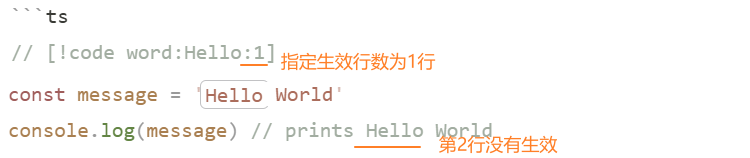
方式二:元字符高亮(transformerMetaWordHighlight)
语法:
根据代码摘要中提供的元字符串高亮词汇。
// 1. 基本语法:默认影响多行
```js /Hello/

// 2. 同时高亮多个单词
```js /Hello|World/ // 仅支持英文
```js /Hello/ /World/ // 支持中文

// 3. 注意:无法指定影响行数示例:基本语法:默认影响多行

注意事项:
- 功能和
markit-down冲突
代码装饰
https://shiki.tmrs.site/guide/decorations
行号
可以通过以下配置为每个代码块启用行号:
export default {
  markdown: {
    lineNumbers: true
  }
}导入代码片段
可以通过下面的语法来从现有文件中导入代码片段:
@/: 表示绝对路径(也可以使用相对路径)#snippet:表示代码文件中自定义的区域名js// #region snippet function foo() { // .. } // #endregion snippet export default foo{highlightLines}: 表示行高亮{highlightLines js}:中的 js 表示指定的语言
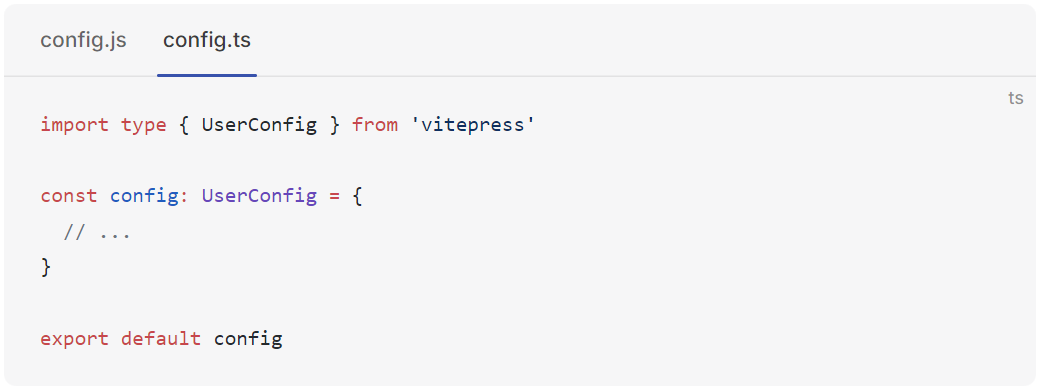
<<< @/filepath#snippet{highlightLines js}代码组
可以像这样对多个代码块进行分组:
:::code-group

```js [config.js]
/**
 * @type {import('vitepress').UserConfig}
 */
const config = {
  // ...
}

export default config
```

```ts [config.ts]
import type { UserConfig } from 'vitepress'

const config: UserConfig = {
  // ...
}

export default config
```

:::
包含 markdown 文件
可以像这样在一个 markdown 文件中包含另一个 markdown 文件,甚至是内嵌的。
# Docs

## Basics

# 基本使用
<!--@include: ./parts/basics.md-->

# 使用绝对路径
<!--@include: @/docs/parts/basics.md-->

# 选择行范围,格式可以是:{3,}、 {,10}、{1,10}
<!--@include: ./parts/basics.md{3,}-->parts/basics.md文件:
Some getting started stuff.

### Configuration

Can be created using `.foorc.json`.图片预览【
TODO: 添加图片预览功能:https://zichin.com/blog/1.VitePress/3.怎么给 vitepress 添加点击图片放大预览功能.html
vue
自定义组件
1、在.vitepress/theme/components/目录中创建组件Counter.vue
注意: vue中的写法和vue的SFC写法一样
<script setup>
import { ref } from 'vue'

const count = ref(100)
function increment() {
  count.value++
}
</script>

<template>
  <div class="counter">
    <div class="show">当前计数:{{ count }}</div>
    <button class="btn" @click="increment">+ 1</button>
  </div>
</template>

<style lang="less" scoped>
.counter {
  display: flex;
  border: 1px solid red;
  padding: 20px;

  .btn {
    background: skyblue;
    padding: 0 30px;
    margin-left: 30px;
  }
}
</style>2、注册并使用组件
全局组件:
1 在
.vitepress/theme/index.js中注册全局组件jsimport Counter from './components/Counter.vue' /** @type {import('vitepress').Theme} */ export default { ... enhanceApp({ app, router, siteData }) { // 注册全局组件 app.component('Counter', Counter) } }2 在md文件中使用Counter组件,无需import
md# index <Counter />
局部组件: 直接在md文件中使用import导入,并使用
vue<script setup> import Header from '../../.vitepress/theme/components/Header.vue' </script> # index <Header />
布局插槽
默认主题的 <Layout/> 组件有一些插槽,能够被用来在页面的特定位置注入内容。
1、在.vitepress/theme/index.js中配置Layout
import { h } from 'vue'
import DefaultTheme from 'vitepress/theme'
import MyComponent from './MyComponent.vue'

export default {
  extends: DefaultTheme,
  Layout() {
    return h(DefaultTheme.Layout, null, {
      'aside-outline-before': () => h(MyComponent)
    })
  }
}2、默认主题布局的全部可用插槽如下:
- 当
layout: 'doc'(默认) 在 frontmatter 中被启用时:doc-topdoc-bottomdoc-footer-beforedoc-beforedoc-aftersidebar-nav-beforesidebar-nav-afteraside-topaside-bottomaside-outline-beforeaside-outline-afteraside-ads-beforeaside-ads-after
- 当
layout: 'home'在 frontmatter 中被启用时:home-hero-beforehome-hero-info-beforehome-hero-infohome-hero-info-afterhome-hero-actions-afterhome-hero-imagehome-hero-afterhome-features-beforehome-features-after
- 当
layout: 'page'在 frontmatter 中被启用时:page-toppage-bottom
- 当未找到页面 (404) 时:
not-found
- 总是启用:
layout-toplayout-bottomnav-bar-title-beforenav-bar-title-afternav-bar-content-before- s
nav-bar-content-after nav-screen-content-beforenav-screen-content-after
功能扩展
自定义JS代码
问题: 打包时报错:ReferenceError: document is not defined
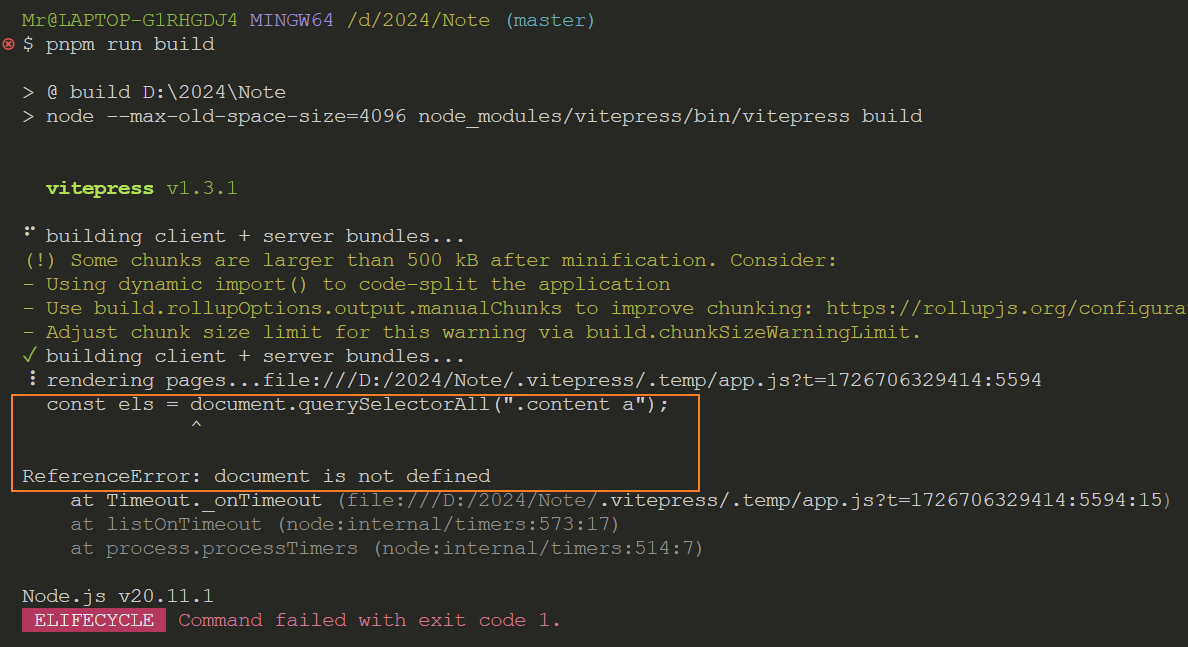
分析: 这是因为在 .vitepress/theme/index.js 文件中在node环境中调用了document
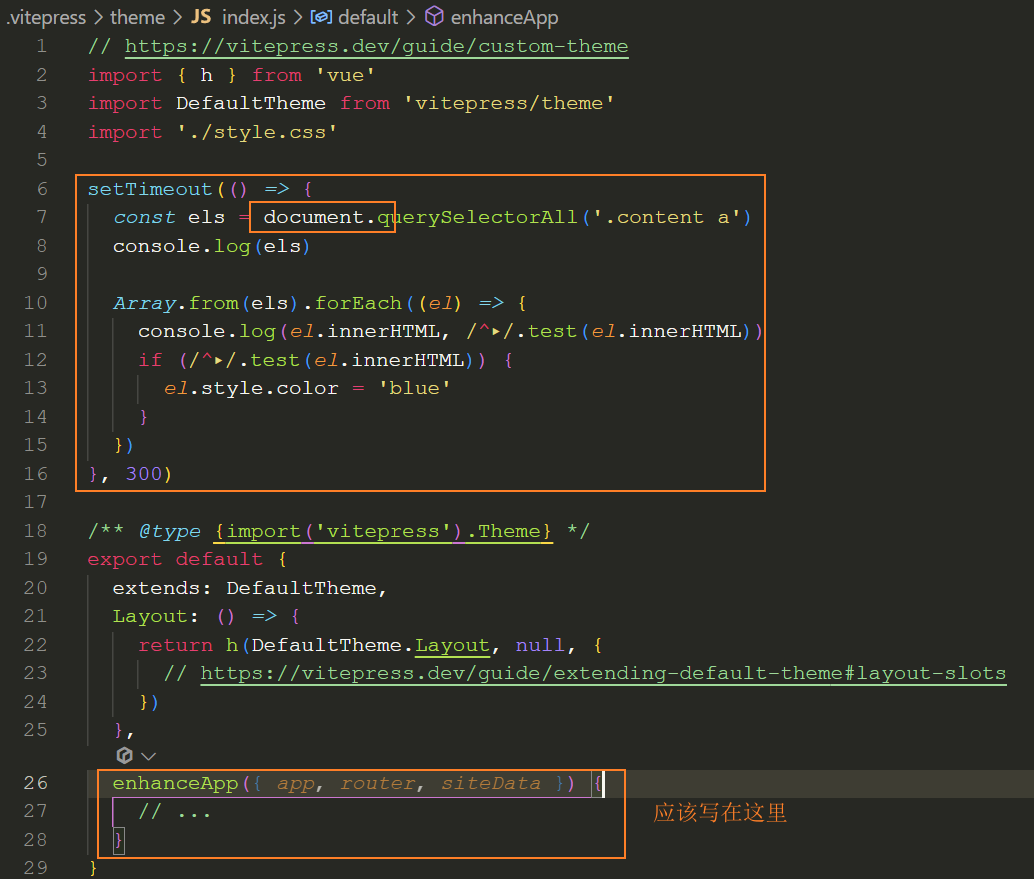
解决: 将自定义代码放入 enhanceApp 函数中并使用 app.mixin() 来混入生命周期钩子mounted来确保在浏览器加载后执行。
// 最终代码
// https://vitepress.dev/guide/custom-theme
import { h } from 'vue'
import DefaultTheme from 'vitepress/theme'
import './style.css'
/** @type {import('vitepress').Theme} */
export default {
extends: DefaultTheme,
Layout: () => {
return h(DefaultTheme.Layout, null, {
// https://vitepress.dev/guide/extending-default-theme#layout-slots
})
},
enhanceApp({ app, router, siteData }) {
// 自定义代码
app.mixin({
mounted() {
let els = document.querySelectorAll('.content a')
let hs = document.querySelectorAll('.content h1,h2,h3,h4,h5,h6,h7,h8')
索引页
1、在.vitepress/theme/data/web.data.mjs中使用 createContentLoader() 方法动态加载md文件
import { createContentLoader } from 'vitepress'

export default createContentLoader('/doc/web/*.md')2、将doc/web.md文件作为索引页,并在其中导入web.data.mjs导出的动态md文件列表
<script setup>
import { data } from '/.vitepress/theme/data/web.data.mjs'
</script>3、对data数据通过 formatPages() 方法进行格式转换,并将转换后的数据传递给<ArticleIndex>组件
<script setup>
import { data } from '/.vitepress/theme/data/web.data.mjs'
import { formatPages } from '/.vitepress/theme/utils/formatPages'
import ArticleIndex from '/.vitepress/theme/components/ArticleIndex.vue'

const files = data.map(item => item.frontmatter.title)
+ const pages = formatPages(files, 'web')
</script>

<ArticleIndex :pages="pages" />4、实现formatPages()方法
export function formatPages(files, dir) {
  // console.log(files, dir)
  // 获取最大的章节号
  const lastTitle = files[files.length - 1]
  const max = Number(lastTitle.match(/^[A-Z](\d+)-/)[1])

  const pages = []
  for (let i = 0; i < max + 1; i++) {
    const page = {
      chapter: '',
      articles: []
    }
    files.forEach((item, index) => {
      const article = {}
      const num = String(i + 1).padStart(2, '0')
      // console.log(item)
      item = item?.replace(/.md$/, '')
      // console.log(item)

      if (new RegExp(`^[A-Z]${num}`, 'i').test(item)) {
        const chapter = item.match(/^[A-Z]\d+-\d+ (.*?)-/)[1]

        article.title = item
        article.url = `/doc/${dir}/${item}.html`
        if (!page.chapter) {
          page.chapter = chapter
        }
        page.articles.push(article)
      }
    })
    pages.push(page)
  }

  // console.log('pages: ', pages)
  return pages
}5、实现<ArticleIndex>组件
<script setup>
const props = defineProps({
  pages: {
    type: Array,
    default: () => []
  }
})
</script>

<template>
  <div class="article-index">
    <template v-for="page in pages" :key="page.chapter">
      <div class="section" v-if="page.chapter">
        <div class="chapter">{{ page.chapter }}</div>
        <ul class="list">
          <template v-for="article in page.articles" :key="article.url">
            <li class="item">
              <a class="title" :href="article.url">{{ article.title }}</a>
            </li>
          </template>
        </ul>
      </div>
    </template>
  </div>
</template>

<style lang="less" scoped>
ul,
li {
  margin: 0;
  // padding: 0;
  list-style: none;
}
a {
  color: #5c8ec6;
  text-decoration: none;

  &:hover {
    color: #3451b2;
  }
}

.section {
  padding-bottom: 20px;
  border-top: 1px solid #dedede;
}
.chapter {
  font-weight: 700;
  line-height: 45px;
}

.list {
  .item {
    line-height: 30px;
  }
}
</style>自动生成侧边栏
1、在config.mjs文件中,调用 generateMenu() 方法,动态获取文档目录中的md文件
// 读取文件列表
+ let files = await generateMenu('web')
files = files.filter((item) => /^[A-Z](\d+)-/.test(item))2、实现 generateMenu() 方法,主要方法是 fs.readdirSync()(待优化)
// .vitepress\theme\utils\generateMenu.js

import fs from 'fs'
import path from 'path'

// 递归读取文件夹
export default function (dir) {
  async function readFolders(folder) {
    const pages = []
    const files = await fs.readdirSync(folder, { withFileTypes: true })

    files.forEach((file) => {
      if (file.isDirectory()) {
        const newFolder = path.resolve(__dirname, file.name)
        readFolders(newFolder)
      } else {
        pages.push(file.name)
      }
    })

    return pages
  }

  return readFolders(path.join(path.resolve(), '/doc/', dir))
}3、在config.mjs中格式化文件列表为二维数组
// 格式化文件列表为二维数组
const webPages = formatPages(files, 'web')
const summaryPages = formatPages(files, 'summary')4、在config.mjs中通过 genAside() 方法格式化webPages数组为sidebar格式的数据
export default defineConfig({
  ...
  // 主题配置
  themeConfig: {
    nav: [
      { text: 'Web', link: '/doc/web' },
      { text: '前端常用', link: '/doc/summary' }
    ],

    sidebar: {
      '/doc/web/': genAside(webPages),
      '/doc/summary/': genAside(summaryPages)
},5、实现 genAside() 方法
export function genAside(pages) {
  return pages.map((page) => {
    return {
      text: page.chapter,
      items: page.articles.map((article) => {
        return {
          text: article.title.match(/^[A-Z]\d+-\d+ .*?-(.*?)$/)[1],
          link: article.url
        }
      })
    }
  })
}保持当前标题可见
/** 保持当前标题滚动到可视区内 */
+ keepActiveElVisible()

/** 保持当前标题滚动到可视区内 */
function keepActiveElVisible() {
  let index = 0
  window.addEventListener(
    'scroll',
    throttle(() => {
      const activeEl = document.querySelector('.outline-marker')
      const asideContainerEl = document.querySelector('.aside-container') // offsetHeight,scrollHeight, scrollTo()
      const liEl = document.querySelector('.outline-link.active')

      const paddingTop = parseInt(getComputedStyle(asideContainerEl).paddingTop.replace('px', ''))
      const liHeight = liEl?.offsetHeight // 32
      const scrollTop = asideContainerEl?.scrollTop
      const clientHeight = asideContainerEl?.offsetHeight
      const activeTopRaw = parseInt(activeEl.style.top.replace('px', ''))
      const activeTop = activeTopRaw + paddingTop + liHeight * 2
      const top = activeTop - clientHeight + liHeight

      // 滚动到下方不可见
      if (scrollTop + clientHeight < activeTop) {
        asideContainerEl.scrollTo({ top, behavior: 'smooth' })
      }

      // 滚动到上方不可见
      if (scrollTop > activeTopRaw) {
        asideContainerEl.scrollTo({ top: scrollTop - liHeight, behavior: 'smooth' })
      }
    }, 200)
  )
}注册全局方法
1、定义: 在.vitepress\theme\index.js的enhanceApp()方法中使用app.config.globalProperties.xxx来注册全局的方法或属性。
export default {
  enhanceApp({ app, router, siteData }) {
    // ...
    app.config.globalProperties.genUrl = (title, dir = 'web') => {
      return `/doc/${dir}/${encodeURIComponent(title.replace(/-API$/i, ''))}-API.html`
    }
  }
}2、使用: 在md文件或其他组件中可以直接使用注册过的方法或属性,如genUrl($frontmatter.title)
- <a :href="`${genUrl($frontmatter.title)}#transform`"><u>transform</u></a>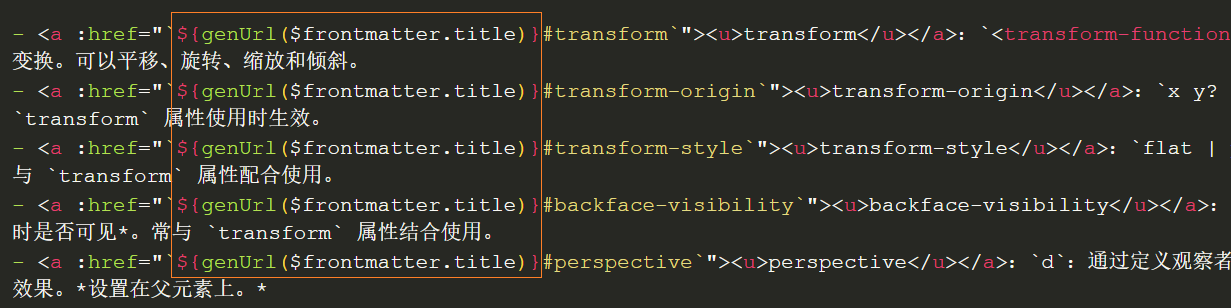
手机端中文加粗
1、下载微软雅黑字体
2、通过 transfonter 或 FontStore 网站,将下载的字体中的粗体(小于15M大小)转换为CSS可以使用的@font-face字体(后缀为woff或woff2)。
3、下载并将转换后的woff后缀字体保存到/public/fonts/目录中
4、在.vitepress\theme\style.css文件中定义@font-face。
@font-face {
  font-family: 'MicrosoftYaHei';
  src: url('/fonts/MicrosoftYaHei.woff') format('woff'),
       url('/fonts/MicrosoftYaHei.woff2') format('woff2');
  font-weight: bold;
  font-style: normal;
}5、将<strong>、<s>或<del>标签的font-family设置为MicrosoftYaHei。
s, del {
  font-family: 'MicrosoftYaHei', sans-serif;
  color: #eb6900;
  text-decoration: none;
  font-weight: bold;
  font-size: 1.4rem;
}

.vp-doc strong {
  font-family: 'MicrosoftYaHei', sans-serif;
  font-weight: bold;
}6、重新打包项目,手机端中文字体就加粗显示了。